Simple steps to enable telnet on CentOS7

# you can first check if service already installed
rpm -qa | grep telnet

# install telnet service
yum install -y telnet-server telnet

# start and enable service at boot
systemctl start telnet.socket
systemctl enable telnet.socket

# if not yet installed firewall
yum install -y firewalld

# add rule to firewll to allow telnet
firewall-cmd --add-service=telnet --zone=public
firewall-cmd --add-service=telnet --zone=public --permanent

firewall-cmd --reload

# check if port telnet is opening/listening
lsof -i -P -n
firewall-cmd --list-all

# test locally
telnet localhost
# or test from other machine point to server ip
telnet IP_ADDRESS

# you might want to verify with other scanning tool like nmap
nmap -p 23 IP_ADDRESS

If you are on Windows client you can install git-bash or add “Telnet client” features

How to install USB wireless dongle on Kali Linux or Ubuntu

For this tutorial, I have a DWA-182 USB wireless dongle which is one of the affordable devices that we can start with when getting into Wireless hacking/pen testing on Kali Linux.

Now, I’ll show you how to get it works.

My scenario:

  • I have Kali 2017.3 32 bit as installed on Virtualbox on Macbook air (early 2015)
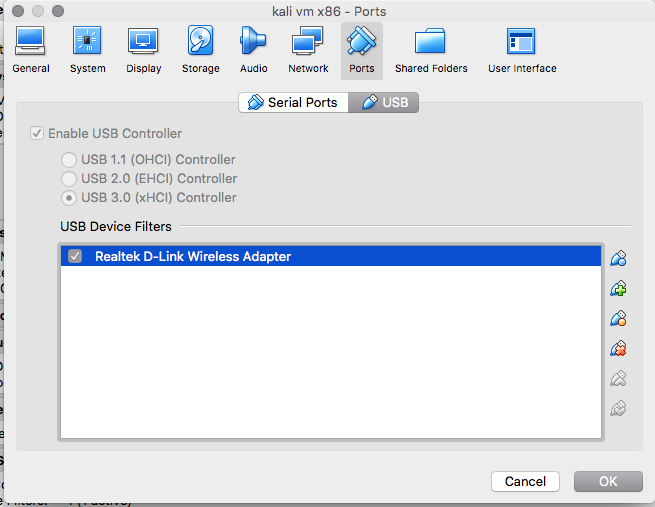
  • I have DWA-182 (rev. C1) USB wireless dongle connected my Kali VM from my Mac (refer to below figure)

Screen Shot 2018-01-30 at 3.51.25 AM

How to get your WiFi working

  1. Log in as super user root with password toor
  2. Open terminal and issue
$ lsusb (you should see D-Link adapter)
$ apt update && apt upgrade -y
$ apt install realtek-rtl88xxau-dkms -y (rtl8812au-dkms for ubuntu)
$ reboot
==== after reboot ===
$ ifconfig (you should see wlan0 now)
$ ifconfig wlan0 down
$ iwconfig wlan0 mode monitor
$ ifconfig wlan0 up
$ tcpdump -I -i wlan0 -w ~/my-trace.pcap (listen packets on air)

Screen Shot 2018-01-30 at 3.44.24 AM

*** note that to know which chipset drivers to install, you can check here:

https://wikidevi.com/wiki/D-Link_DWA-182_rev_C1

Then you’ll see that DWA-182 uses Realtek RTL8812AU

Understanding TCP window size and ACK

Answer from: https://networkengineering.stackexchange.com/questions/12485/window-size-and-ack-number

I teach TCP, and I often run into people who were mis-taught that the ACK is only sent when the Window Size is reached. This is not true. (To be really transparent, I too taught this incorrectly before I knew better as well, so I completely understand the mistake).

NOTE, I’ll be using Receiver/Sender to describe it, but keep in mind TCP is bidirectional, and both parties maintain a Window Size.

The Window Size (that the Receiver sets) is a hard limit on how many bytes the Sender can send without being forced to stop to wait for an acknowledgement.

The Window Size does not determine how often the Receiver should be sending ACKnowledgements. Originally, the TCP protocol called for an acknowledgement to be sent after each segment was received. Later, TCP was optimized to allow the Receiver to skip ACKs and send an ACKnowledgment every other packet (or more).

The goal of TCP then, is for the Sender to continually be sending packets, without delay or interruption, because it continually receives ACKnowledgements, such that the count of “bytes in transit” is always less than the Window Size. If at any time, the Sender has sent a count of bytes equal to the window size without receiving an ACK, it is forced to pause sending and wait.

The important thing to consider in all this is the Round Trip Time. Often, when you are studying TCP in a wireshark, you are only seeing the perspective of one party in the TCP conversation, which makes it hard to infer, or truly “see”, the effect of the RTT. To illustrate the effect of RTT, take a look at these two captures. They are both capturing the same conversation, a 2MB file download over HTTP, but one is from the perspective of the Client, and the other is from the perspective of the Server.

Note: its easier to analyse TCP if you turn off the Wireshark feature “Allow subdissector to reassemble TCP streams

Notice from the Server side capture (who is the sender of the file), the Server sends 8 full sized packets in a row (packet#’s 6-13) before receiving the first ACK in packet# 14. If you drill down in that ACK, notice the Client’s acknowledgement is for the segment sent in Packet#7. And the ACK the Client sent in packet 20 is from the segment sent in Packet#9.

See how the Client is indeed acknowledging every other packet. But it almost seems like it is acknowledging them “late”. But in fact, this is just the effect of Round Trip Time. The Sender is able to send 7~ segments in the time it takes for the first segment to reach client and for the client’s ACK to reach the server. If you take a look at the capture from the Client’s perspective, it looks very ‘clean’, which is to say that every second packet it receives, it sends out an ACK.

Notice also what happens at Packet# 23. The Server has sent all it can, because the “bytes in transit” reaches the Window Size, so it is forced to stop sending. Until the next ACK arrives. Since the ACK’s are coming in every other segment received. Each ACK allows the sender to again send two new segments, before the Window is full again, and the Server is again forced to pause. This happens up until Packet# 51, when the Client (Recever) increases the Window Size significantly, allowing the Server (sender) to start transmitting data uninhibited again… at least until Packet #175, when the new Window fills up.

Create Multiple Users in Linux using Python script

The last post for years, I showed how to create multiple in Linux using a shell script. But the limitation is that every user needs to use the same given password. This time, I’ll show you how to create multiple users in Linux using Python script. I know that most of Linux (maybe all, if I’m not wrong) come with Python (.py) as default as Shell script (.sh), so you don’t need to worry if you need to install additional Python package.

E.g. Create three users (john, richhat, jackie) with its own password. Here is how, you need to run a script called multiUser.py followed by user_pass.txt that contains user and password:

$ python multiUser.py user_pass.txt

You can name the file anything you wish and below is the content of each file:

multiUser.py

import sys
import os
import string
import random
import crypt

# function for create one user with supplied password
def createUser(name,passwd):
   two = ''.join(random.choice(string.ascii_letters) for x in range(2))
   encPass = crypt.crypt(passwd, two)
   os.system("useradd -p "+encPass+ " -m "+name)

# main program
if __name__ == '__main__':
   # prepare variables like file name and lists of user and password
   fname = sys.argv[1]
   list_users = []
   list_passwds = []
   # read username and password from file and save to the created lists
   with open(fname,'r') as file:
      for line in file:
         list_temp = line.rstrip('\n').split(" ")
         list_users.append(list_temp[0])
         list_passwds.append(list_temp[1])
   # start creating users
   for i,user in enumerate(list_users):
      createUser(list_users[i],list_passwds[i])

user_pass.txt (separate username and password by space)

john 1234
richhat secret123
jackie 1234567

How to continue the existing container after closed

You can restart an existing container after it exited and your changes are still there.

Below is how to start your last closed container:
$ docker start  `docker ps -q -l` # restart it in the background
$ docker attach `docker ps -q -l` # reattach the terminal & stdin

But if you want to start any container, you just need to issue:

$ docker start <container id> && docker attach <container id>

E.g.


Ref: https://stackoverflow.com/questions/21928691/how-to-continue-a-docker-which-is-exited

How to create a bootable USB drive without additional/third-party tool

# How to create a bootable USB drive without additional/third-party tool
# Prerequisite:
# USB (g:) -> disk 2 (in diskpart)
# CD Windows 7 (d:)

# run "diskpart" as administrator
select disk 2
clean
create partition primary
active
format fs=ntfs quick

# run "cmd" as administrator
cd d:
cd boot
bootsect.exe /nt60 g:
xcopy d:\ g:\ /s /e /r /c /h /k /o /x /y

# Let have fun :)

# Note: It would work the same for Windows 8 or 10